Secure Your WooCommerce Payments in Minutes
🚀 How to Install & Configure CODARAB Pay Redirect | WooCommerce High-Risk Redirect Plugin
Step-by-step guide to install CODARAB Pay Redirect for WooCommerce. Redirect high-risk payments, sync orders via REST API, and ensure PCI compliance.
Table of Contents
- Prerequisites
- Installation
- License Activation
- Configure Redirect Settings
- Testing & Troubleshooting
- FAQs
<a id=”prerequisites”></a>1. Prerequisites
- WooCommerce 5.0+ installed on both Website A (high-risk) and Website B (low-risk).
- PHP 7.4+ and WordPress 6.0+ on both sites.
- SSL Certificate enabled for secure data transfer.
- Admin Access to both WordPress dashboards.
Pro Tip:
Use a staging site to test the setup. Learn how to create a WooCommerce staging site.
<a id=”installation”></a>2. Installation
Step 1: Download the Plugin
- Purchase and download
codarab-pay-redirect.zipfrom your CODARAB account.
Step 2: Upload to Website A
- Go to WordPress Dashboard > Plugins > Add New > Upload Plugin.
- Select the ZIP file and click Install Now.
- Activate the plugin.
Alt Text: Installing CODARAB Pay Redirect plugin in WordPress dashboard.
<a id=”activation”></a>3. License Activation
- Navigate to COARAB Pay Redirect Activate under the WordPress admin menu.
- Enter your Activation Key (sent via email).
- Click Verify to validate the key.
✅ Success: The expiry date will populate.
❌ Error: Contact CODARAB support if the key fails.
Code Snippet (Admin Panel):
php
Copy
add_action('admin_menu', function() {
  add_menu_page(
    'COARAB Pay Redirect Activate',
    'COARAB Pay Redirect Activate',
    'manage_options',
    'codarab_rest_a_activation',
    // ... rest of the code
  );
});
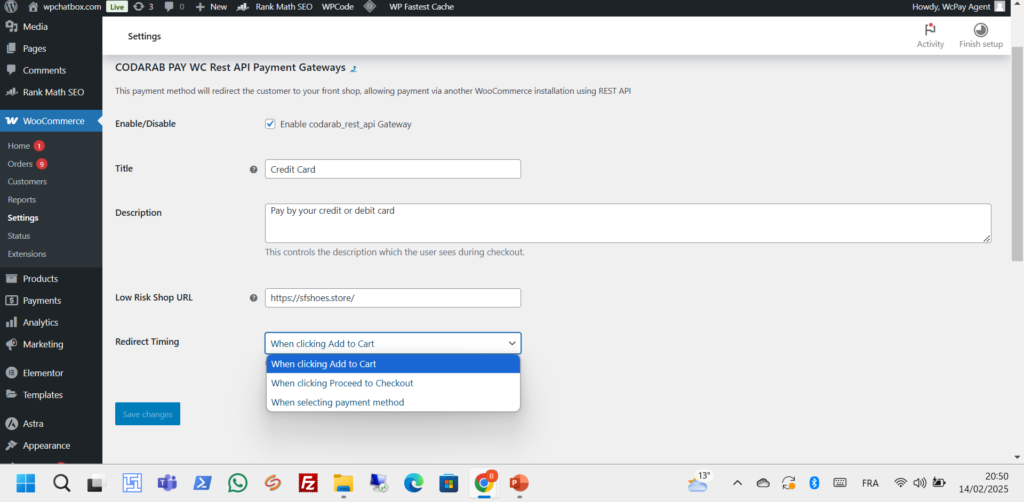
<a id=”configure”></a>4. Configure Redirect Settings
- Go to WooCommerce > Settings > Payments > CODARAB PAY WC Rest API.
- Enable the gateway.
- Key Settings:
- Low-Risk Shop URL: Enter Website B’s full URL (e.g.,
https://lowrisk.yourstore.com). - Redirect Timing: Choose trigger (Add to Cart, Checkout, or Payment Method).
- Order Status Sync: Enable REST API endpoints for real-time updates.
- Low-Risk Shop URL: Enter Website B’s full URL (e.g.,
Alt Text: Configuring redirect timing and low-risk shop URL in WooCommerce.
<a id=”testing”></a>5. Testing & Troubleshooting
Test the Redirect Flow
- Add a product to the cart on Website A.
- Proceed to checkout and select CODARAB Pay Redirect.
- Confirm redirection to Website B’s embedded iFrame checkout.
Common Issues
- 404 Error on Redirect: Ensure Website B’s REST API endpoints are accessible.plaintextCopyExample Endpoint: /wp-json/api/v2/wcwcwcwcwcw837378373773-order-completed
- License Not Valid: Re-validate the key or renew your subscription.
- iFrame Not Loading: Check for mixed content (HTTP/HTTPS conflicts).
Need Help? Visit our Knowledge Base or Contact Support.
<a id=”faq”></a>6. FAQs
Q: Can I use different domains for Websites A and B?
A: Yes! The plugin works across domains, but both must have SSL certificates.
Q: Does this work with WooCommerce Subscriptions?
A: Absolutely. Recurring payments are redirected seamlessly.
Q: How do I update the plugin?
A: Updates are delivered via your CODARAB account. Replace the old plugin files via FTP or WordPress dashboard.
Pro Tips for SEO & Security
- Monitor Performance: Use Google Search Console to track traffic for keywords like “WooCommerce PCI compliance plugin”.
- Secure APIs: Follow OWASP API Security Guidelines to protect REST endpoints.
- Internal Linking: Add links to related guides like How to Reduce Chargebacks.
Ready to Go Live?
Download Plugin | Explore Our WEB DEV Services
Related Articles:
- Top 5 WooCommerce Fraud Prevention Plugins
- PCI Compliance Checklist for E-commerce
- Case Study: Cutting Chargebacks by 70%
Optimized Keywords:
- “Configure CODARAB Pay Redirect”
- “WooCommerce high-risk payment setup”
- “PCI compliance plugin installation”
- “REST API order sync WooCommerce”